JavaScript Unit Tests
This page provides instructions for writing and running JavaScript (JS) unit tests in consumerfinance.gov.
Jest is the framework we use for writing and running JavaScript unit tests. If you’re not familiar with it, it would be a good idea to peruse their docs before diving in here.
Table of contents
- Running unit tests
- Running a single test file
- Run a directory of unit tests
- Run all unit tests
- Where to find tests
- Test-driven development
- Setting up tests
- New test file from sample
- Folder structure (where to put your JavaScript and tests)
- First test run
- File structure (basic layout of a test file)
- Providing test data
- Common test patterns
- Testing a basic function
- Testing DOM manipulation
- Testing browser state
- Testing user interaction
Running unit tests
To run all of the unit tests:
yarn jestTo first lint all files and then run tests:
yarn testNote
To run a single test, or a directory of tests, you can run, for example:
# Single test file:
yarn jest Notification-spec.js
# Equivalent to:
yarn jest test/unit_tests/js/molecules/Notification-spec.js

# Directory:
yarn jest organisms
# Equivalent to:
yarn jest test/unit_tests/js/organisms
Because we invoke jest directly, you can pass any command-line args it accepts to filter your output or to target specific tests see the docs for more.
Where to find tests
The following links list out the main directories containing tests (as of January 2019, this page’s initial publication date).
- All unit tests
- Tests for individual apps
- Tests for regular modules
- Tests for molecules
- Tests for organisms
Test-driven development
We recommend using test-driven development (TDD) when coding new JavaScript. The general concept is to start by writing your test first, with the expected behavior and functionality well-described, then you write the code that makes the test pass. A good pithy summary is:
- Write only enough of a unit test to fail.
- Write only enough production code to make the failing unit test pass.
Then repeat that process until you have written all of the code you need.
Read this primer on test-driven development to learn more about how it differs from the typical approach to programming and unit tests.
Setting up tests
New test file from sample
For this guide, we’ll use very basic sample code files to illustrate how to use the test framework in consumerfinance.gov and how to test very common code patterns.
Another common approach is to look for existing tests that are testing something similar to what you are writing now. Feel free to do so and copy from an existing module and its tests instead of copying the sample files referenced below. For links to existing tests, refer back to the “Where to find tests” section.
Now, let’s begin! Let’s make a new unit test fail, then we will make it pass, following the principles of TDD.
- Copy the sample test file to a new location by running this command from the root of consumerfinance.gov:
cp docs/samples/sample-spec.js test/unit_tests/js/modules/- Copy the sample module file to a new location by running this command:
cp docs/samples/sample.js cfgov/unprocessed/js/modules/Test file names should always match what they are testing,
with the addition of a -spec suffix.
Folder structure (where to put your JavaScript and tests)
JavaScript unit test files belong in the
test/unit_tests/
directory.
The folder structure of the test files mirrors
the structure of the project JavaScript in
cfgov/unprocessed/js/.
When considering exactly where to place JavaScript in these directories,
it might be helpful to review the documentation about
atomic components in consumerfinance.gov.
JavaScript corresponding to atomic elements should go into
the appropriate subfolder for the type of element being implemented.
In our case, sample.js and sample-spec.js don’t relate to atomic elements,
so they can be placed into the uncategorized modules subfolders:
cfgov/unprocessed/js/modules and test/unit_tests/modules, respectively.
Child apps
If you’re working on something in a child app,
put it in test/unit_test/appname/js/.
Otherwise, if you’re working on something that
belongs to consumerfinance.gov generally,
it should go in the corresponding folder under test/unit_test/js/.
First test run
Now that you have your sample JS and test files in the right places,
let’s try running them and see what happens!
I’ll refer to sample-spec.js and sample.js in the instructions below,
but you should work in your own new test file and JavaScript file
to save and commit your changes.
- Edit line 6 of your spec file and remove the call to the
.skipmethod. The line should now read:
it('should return a string with expected value', () => {
  // …
});- Run your sample test using
yarn jest sample-spec.js(substituting your own filename).
You should see output like this:
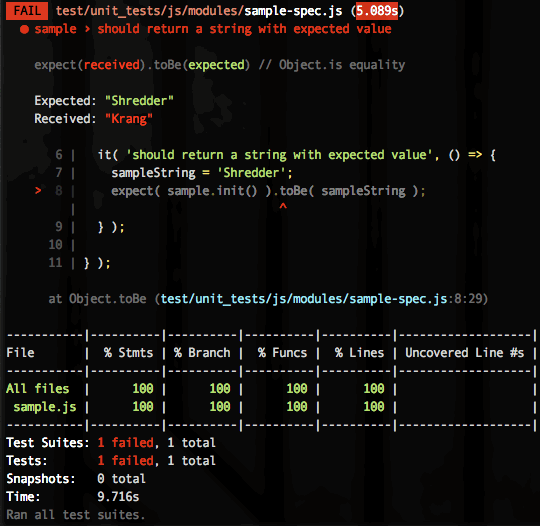
The test should fail – this is expected. Remember, when doing TDD, we want to write our test to fail first, then write the corresponding JavaScript that will make the test pass.
- Make the test pass by changing your script’s line 7
(see
sample.js) to the following:
return 'Shredder';- Run the test again to confirm the test now passes. You should see output like this:
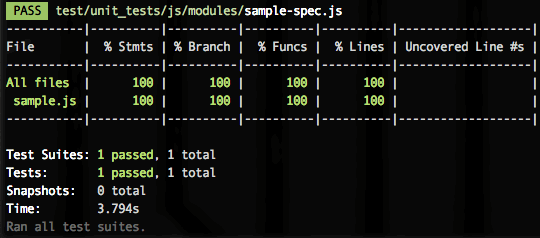
Doesn’t it feel good?
Refer back to the “Running unit tests” section for additional commands to run tests.
File structure (basic layout of a test file)
In order to make the sample-spec.js more meaningful to your own use case,
you’ll need to know how to structure a unit test using Jest methods.
Let’s take a look at the structure of our very basic sample test file.
Loading dependencies
Line 1 of any spec file will use an import statement to
include the JavaScript file that you are testing.
Additional dependencies should be added in the same manner.
// This file has a default export.
import sample from '../../../../cfgov/unprocessed/js/modules/sample.js';

// Or, if the file has a named export, that can be imported.
import { sample } from '../../../../cfgov/unprocessed/js/modules/sample.js';
Read the import reference guide on MDN
on how to implement import for different use cases.
The describe function
In Jest (whose syntax is based on Jasmine),
describe blocks
serve as organizational structures that you can use
to outline the methods you need in your JS module.
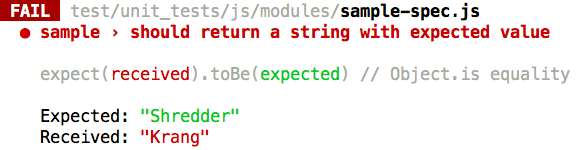
The root describe method is where we put
the name of the JavaScript module we are testing.
For the sample, the name of our module is sample,
so we set this up on line 4 of sample-spec.js:
describe('sample', () => {
  // …
});
This module name will appear in your test output in the console when the test is running:
More complex tests will have additional describe blocks –
children of the root describe block –
that should correspond to a particular method in the module.
For example, if we want to add more functionality to our sample JS,
we could start by writing these tests in sample-spec.js:
describe('sample', () => {
  describe('gimmeString()', () => {
    it('should return a string with expected value', () => {
      const sampleString = 'Shredder';
      expect(sample.gimmeString()).toBe(sampleString);
    });
  });

  describe('gimmeObject()', () => {
    it('should return an object with expected value', () => {
      const sampleObject = {
        image:
          'https://vignette.wikia.nocookie.net/tmnt/images/0/00/Krangnobody.png',
        caption: 'Krang portrait',
      };
      expect(sample.gimmeObject()).toBe(sampleObject);
    });
  });
});
(We’ll talk more about writing the individual tests in the next section.)
And then we would create the gimmeString and gimmeObject methods
in our sample.js file.
Another example is
breakpoint-state-spec.js,
which tests several methods, including getBreakpointState and viewportIsIn,
on the module breakpoint-state.
When using TDD, you may prefer to add describe blocks later,
during the refactor stage of writing code.
Individual tests
Within a describe block, individual tests are encapsulated by it methods,
which is an alias of
Jest’s test method.
Each test must include one or more assertions (usually only one) that confirm that the result of executing some code is what you expected. These are called “matchers” in Jest parlance, and they all follow this format:
expect(someValue).someKindOfComparisonWith(someOtherValue);For example, let’s take another look at the sample tests we wrote above:
describe('sample', () => {
  describe('gimmeString()', () => {
    it('should return a string with expected value', () => {
      const sampleString = 'Shredder';
      expect(sample.gimmeString()).toBe(sampleString);
    });
  });

  describe('gimmeObject()', () => {
    it('should return an object with expected value', () => {
      const sampleObject = {
        image:
          'https://vignette.wikia.nocookie.net/tmnt/images/0/00/Krangnobody.png',
        caption: 'Krang portrait',
      };
      expect(sample.gimmeObject()).toBe(sampleObject);
    });
  });
});
In these tests, we check (expect) that
the string returned by sample.gimmeString()
and the object returned by sample.gimmeObject()
match (toBe) the sampleString and sampleObject
that we defined in the tests.
There are many kinds of assertions you can use
besides the simple equality comparison of toBe.
See the Jest Using Matchers guide
for a primer on them and
the Jest expect API docs
for the full list of its matchers.
Providing test data
The first principle of test data for unit tests is to keep test data as simple as possible – use the minimum needed to test the code.
Direct definition of test data
The simplest way to set up test data is to declare it as variables within each test, e.g., the tests in strings-spec.js. This can include HTML markup for DOM manipulation tests, if each test requires different markup.
Setup and teardown methods
If you will need to leverage the same test data across different tests,
Jest has setup and teardown methods, such as
beforeEach and afterEach, or beforeAll and afterAll,
which can be used to performing actions
that are needed before and after running all tests or each test in a suite.
For example, the tests in
Analytics-spec.js
use both beforeAll and beforeEach inside the root describe block to
do a variable definition for all tests at the beginning of the suite
and reset the dataLayer before each test, respectively.
Check out the Jest documentation on “Setup and teardown” methods.
A common structure when the DOM is involved
is to create a constant representing an HTML snippet to test,
then – in a beforeEach or beforeAll
(depending on whether the tests modify the markup or not) –
set document.body.innerHTML to that snippet.
Use beforeAll to attach HTML markup that is unaffected by the tests,
e.g., the tests in
footer-button-spec.js.
Use beforeEach to reset manipulated markup between tests, e.g., the tests in
Notification-spec.js.
See “Testing DOM manipulation” in the “Common test patterns” section of this page for a more in-depth discussion of this scenario.
Common test patterns
Testing a basic function
Testing simple functions is pretty straightforward.
Each function in a module should have tests set up as
a child describe within the module’s own describe.
Then, write a number of it statements in prose that describe
how the function should respond to various kinds of input.
Inside each it, invoke the function
with the input described in the it statement
and use expect to check that you receive the desired result.
Testing DOM manipulation
Jest, the JavaScript testing framework we use, includes jsdom, which simulates a DOM environment as if you were in the browser. This means that we can call any DOM API in our test code and observe it in the same way as we do in the module code itself, which acts on the browser’s DOM.
As an example, let’s look at our Notification component. The Notification component uses a common set of markup with different classes and SVG icon code to style it as a particular kind of notification (success, warning, etc.). In the component JS, we have this function that sets the type of a notification before displaying it:
function _setType(type) {
  // If type hasn't changed, return.
  if (_currentType === type) {
    return this;
  }

  // Remove existing type class
  const classList = _dom.classList;
  classList.remove(`${BASE_CLASS}___${_currentType}`);

  if (type === SUCCESS || type === WARNING || type === ERROR) {
    // Add new type class and update the value of _currentType
    classList.add(`${BASE_CLASS}___${type}`);
    _currentType = type;

    // Replace <svg> element with contents of type_ICON
    const currentIcon = _dom.querySelector('.cf-icon-svg');
    const newIconSetup = document.createElement('div');
    newIconSetup.innerHTML = ICON[type];
    const newIcon = newIconSetup.firstChild;
    _dom.replaceChild(newIcon, currentIcon);
  } else {
    throw new Error(`${type} is not a supported notification type!`);
  }
  return this;
}
This function would be invoked by an instance of the Notification class.
_dom is the DOM node for the Notification.
As you can see from the code comments above,
it has a few different steps that modify the DOM node.
Now let’s look at the tests. Here are the first 22 lines of the spec file that tests this component:
const BASE_CLASS = 'm-notification';
import Notification from '../../../../cfgov/unprocessed/js/molecules/Notification';
const HTML_SNIPPET = `
  <div class="m-notification">
    <svg xmlns="http://www.w3.org/2000/svg" viewBox="0 0 1000 1200" class="cf-icon-svg"></svg>
    <div class="m-notification__content">
      <div class="m-notification__message">Notification content</div>
    </div>
  </div>
`;

describe('Notification', () => {
  let notificationElem;
  let notification;
  let thisNotification;

  beforeEach(() => {
    document.body.innerHTML = HTML_SNIPPET;
    notificationElem = document.querySelector(`.${BASE_CLASS}`);
    notification = new Notification(notificationElem, BASE_CLASS, {});
  });

  // …
});
The main things to note here at the beginning of the file are
the addition of the HTML_SNIPPET definition,
containing the markup we will used for testing
as it would be rendered for this component,
and the beforeEach function that
(1) uses jsdom to add that snippet to the test environment
and assigns the component node to the notificationElem variable, and
(2) creates a new instance of the Notification class.
A word about HTML_SNIPPETs
Right now it’s possible to update a component’s Jinja template,
forget to update the corresponding JavaScript,
and the unit tests would still pass,
because they're using their own HTML_SNIPPET.
It would be preferable if we had a canonical component markup template
that is pulled in by the application, the unit tests, and the docs.
We haven’t yet figured out how to do this, since
our component templates contain Jinja tags that
the tests would have to reconcile
into a complete, finished chunk of markup.
For now, just be aware of this when
editing a Wagtail component that includes JavaScript.
Further down, here are some of the tests that cover the _setType function
(by way of the setTypeAndContent function that
wraps both _setType and _setContent):
describe('setTypeAndContent()', () => {
  it('should update the notification type for the success state', () => {
    notification.init();

    notification.setTypeAndContent(notification.SUCCESS, '');

    expect(notificationElem.classList).toContain('m-notification--success');
  });

  it('should update the notification type for the warning state', () => {
    notification.init();

    notification.setTypeAndContent(notification.WARNING, '');

    expect(notificationElem.classList).toContain('m-notification--warning');
  });

  // …
});
This part mostly works like testing any other function.
The notable distinction here is that the test invokes the function
using the DOM nodes and class set up in beforeEach.
Testing browser state
Another common thing to test is code that interacts with the state of the browser itself, e.g., fragment identifiers, query strings, or other things in the URL; the window object; session storage; page history; etc.
One way of doing this is to create a spy (a special kind of mocked function) that watches for browser API calls to be made a certain number of times or with a specific payload.
Testing user interaction
Testing user interaction with simulated pointer events, keystrokes, or form submissions is best handled via browser tests, not unit tests. User interaction in a unit test could falsely pass if the component wasn’t visible on the page, for instance. Read more about how we run browser tests with Cypress.